

Hellvape Dead Rabbit 3 RDA Review
These guys just haven’t stopped this year! Hellvape have been pushing out new versions of their products all year, several in their Dead Rabbit range, including the innovative Dead Rabbit R Tank, and Fat Rabbit to name just a few!
The changes to their range run from basic aesthetics right through to completely new innovative features like the onboard rebuildable mesh on the Dead Rabbit R Tank.
Today’s review is an update of their tried and true, popular RDA the Dead Rabbit. We’ve seen version one and two, we are up to the 3rd iteration, and I think it’s their best yet!
Let’s check out Hellvape’s Dead Rabbit 3 RDA!
Big thanks goes to Vaporstate, who sent this out for the purposes of review!


Specifications and Features
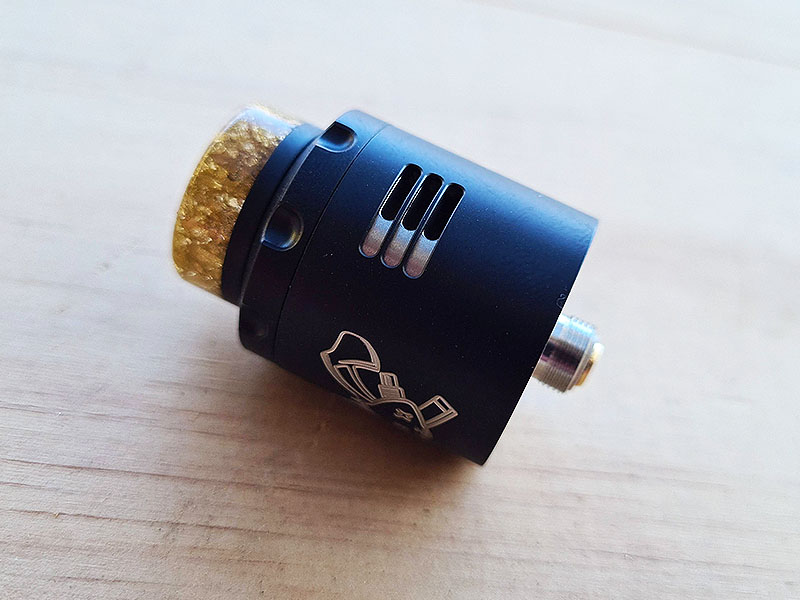
- Size: 24×37.35mm
- 810 Resin Ag+ drip tip
- Material: Stainless steel
- Dual coil configuration
- Side feeding squonk
- Honeycomb and Slotted airflow
Product Includes
- Dead Rabbit V3 RDA
- Ni80 0.37Ω fused claptons coils x2
- Cotton shoelace strips x2
- BF Pin
- Extras bags
- User manual
Photos


General Info & Features


The Dead Rabbit RDA’s have become famous in the vape world for being not only easy to build on, but catering for all types of airflow preferences, while being squonkable and also for their striking appearance. They are also priced competitively, enabling all vapers to jump on board with a dependable RDA for every day use.
The Dead Rabbit 3 doesn’t change any of that, it’s still the dependable, easy to use RDA like it’s predecessors, Hellvape have just improved things a little. It’s a similar size to the previous versions, also still retaining it’s drop style deck, with the coils sitting above the posts with wicks hanging down. Where it does differ, is in it’s new dual style airflow (both cyclops style slots and honeycomb options), and the more rounded deck posts, where they were more squared off before.
This 4 piece RDA is a pleasure to use, due to how easy it is to build on, and it’s versatility for vapers who like different vaping styles. Love to drip? No problems! You’re a squonker? You’re covered there too! You can even get a mouth to lung draw from it, even if it’s built mainly for larger airflow and bigger, denser clouds.
The Deck and Build


As you can see from my build photos above, Hellvape have rounded your coil posts out on the new version, this helps the airflow get around the posts easier, enhancing the flavour of this new RDA over the previous versions.
Building is dead simple, unscrew the flathead screws, place your coils then tighten them down. Clip the excess coil legs from underneath (a little bit more difficult on this version than previous) then you can get onto dry firing and teasing your coils to get rid of any hotspots. I had a little trouble with getting my clippers in under the posts, so I pre-cut mine, you may have to also, as the posts are significantly lower on this version.
Wicking is as simple as it ever was, run your cotton through the coils, down over the edge of the posts and cut flush to the deck’s juice well.

As you can see in this photo, when squonking, your eliquid will come out the side of the centre block, pushing straight onto your wicks from the inside for better wicking.
Of note, clipping the ends of your coil legs off, can be quite difficult as there isn’t much room under the new posts to get your clippers in. It’s do-able, but not as easily done as the previous versions. Lifting those posts a little higher would help, but of course would also add to the distance your eliquid would need to travel to the coil.
Airflow

The original Dead Rabbit and the v2 had separate airflow styles, but you needed to use a different cap for both. With the new v3, the two styles (slotted and honeycomb) feature on the same cap, so no need to swap them out.
When using the honeycomb airflow option, there are 15 holes on either side, to get a nice slightly turbulent airflow at any level you desire, while with the slotted smoother airflow, there are 3 large slots on either side. Switching between the two styles is as easy as rotating the top cap around to find the correct setting.
The top cap is conical, ensuring the airflow condenses before getting to the mouthpiece for better flavour, and the entire cap plus barrel, also rotate a little to make sure you can line those airholes up perfectly with your coils!! (something may RDA’s fall short on)
Pros:
- Great looking RDA
- Machining is excellent
- Airflow options galore
- Easy to build on
- Better squonking
- Conical top cap
- Rotating barrel to line up airflow to coils
- Great flavour
Cons:
- Can be a little tight getting clippers under the posts to cut coil legs
Where to Buy:
You can pick up the Hellvape Dead Rabbit 3 RDA locally from Vaporstate’s online store. They’ve got them listed for the $50 AUD mark, which is an excellent price.
Conclusion
While there have been minimal changes that set the v3 apart from the previous versions, they do make a difference. It’s lovely to be able to swap between the two different airflow styles on the go, and it just feels like this is a much more refined product than the previous Dead Rabbit RDA’s. I’ve been using this as a squonking RDA over the last few weeks, and it quite literally is a pleasure to use. To be honest, I’ve been that pleased with this as a squonking RDA, I’ll likely continue using this for some time to come.
If you’re on the fence about upgrading, I think the V3 is definitely a worthwhile upgrade, so much so, that your other RDA’s just might end up in a drawer somewhere never to be seen again!
Great work Hellvape!
Rating overview


 Review")

 Review")

